Showing posts with label how to. Show all posts

Monday, September 22, 2008

How To Unprotect Word Document

Sometime you will find MS Word document that you need to edit. Or perhaps a new word document which you want to use the template for your own project. Instead of "reinventing" the format, it would save alot of time by using the document as a template. But alas, the document is protected. So? Let "unprotect" the document.

Note: Please use this on your own prerogative. I do not accept responsiblity for any violation of law.

1) Open the protected document.
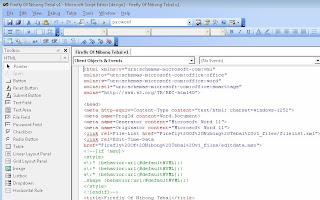
2) Press Alt + Shift + F11 to launch the script editor (see below).


3) Press Ctl + f to find the line with the word "password" (see below).


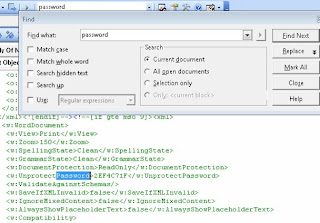
4) Delete the password (eg "2EF4C71F") between the tag "UnprotectPassword" and "/UnprotectPassword".
5) Save the script editor.
6) Close the script editor.

To open the document:
1) Click Tools --> Unprotect.
2) Your document is now Unprotected and ready for editing.

Friday, July 20, 2007

How To Copy Video (from Youtube.Com)

I received an email asking on How To Copy Video.

"Let's say i want to "steal" a video in one of your blog to put it into my blog, how should i do that? Meaning: Blog to blog transfer of video. Do i need to 1st, find a way to "take" your video out from your blog & upload it into a hosting site (like youtube), then only put it into my blog? Or can i go to the "source" of the post, and just copy-paste the html into my blog? If this is the way, is that also mean i need to be able to identify the exact html of the video and copy-paste that video portion only? (usually the html will inclusive of all info/setting of the whole post, and video is just a small part of it). Don't worry, i am not going to steal your video"

Answer:
To copy a video from the internet into your website is quite easy if you know the process. There are two aspects of copying.

First to copy video directly from Youtube.com and second to copy from a website with Youtube's video.

Today I am going to talk about copying video directly from Youtube.Com to your website.

Step 1. Suppose you open my video website at www.youtube.com/forestexplorers.
Type the URL as shown (see 1 below).

Step 2. Next you scroll down to check all the videos.

Step 3. Choose a video - Let say you choose : Giant Ant vs Earthworm (by clicking on the picture)


Step 4. Next, click on the EMBED code (see below)


Step 5. Then you RIGHT-CLICK and COPY the code.
Step 6. Paste the code at your website.
DONE.
BTW, you don't have to worry as all videos in YouTube.Com are FREE for use by everyone. Please take as many as you want. Of course you can't edit it to claim authorship.

Next, how to copy video from a website with YouTube's video.

Friday, June 1, 2007

How To Zip File

But first you need to understand what and why of file ZIPPING!

What is a ZIP archive? Archives are like folders which contain other files. Files in the archive are usually compressed. Because they compressed the files, we called them ZIPPED files. Archives usually have file names ending with ZIP, LZH, ARJ, or ARC, depending on how they were created. ZIPPING the files (or Archiving the files) make it easy to group files and make emailing, copying and sharing of these files faster through the internet. The most common is ZIP.

How Does Zipping Works?

Compression (or zipping) has the advantages of compressing files such as documents, text based files, certain kinds of images and etc. When you "ZIP" a file, it removes all the "extra stuff" from that file. It actually remove all of the blank spaces (carriage returns, spaces, etc..) and leave special information so that when it's uncompressed the spaces return. As for images the program will tend to blend colors and remove white space to compress the image. There are files - such as MP3s and JPGs are already compressed when they are created so they cannot be compressed any further by zipping them. That is why certain file remain almost the same size after being compressed.


How To Create a ZIP folder (Archive)

1. At your computer desktop (screen), place your mouse on a blank space.
2. Right Click --> New --> Compressed (Zipped) Folder --> Type a filename for the folder.
3. Your Zipped Folder is ready. Now to compress your documents
--> Drag File(s) directly onto the Folder.
--> Your documents have been compressed.
4. Now you are ready to send the zipped folder through your email.


How To Delete File(s) in the ZIP folder (Archive)

To open the ZIP folder --> Simply double click on the Archive FOLDER.
Then select the file you want to delete --> Click 'Delete' button --> YES


How To Unzip (extract) From An Archive

Open the ZIP folder (by double clicking it)
Then double click on the Selected file.


There are also archive where it will launch the default associated ZIP program installed on your system and open the archive. In that case, you can then select any file or all files in the archive and hit the 'Extract' button to unzip the file(s). The ZIP program will ask you for directory to extract to, filename to extract and so on. Simply answer all queries.

Wednesday, March 21, 2007

How To Add AdSense

After you have registered as member for Google AdSense, you have to put in a little effort to monetize it.

Open your blog. Example (type at the address bar of your browser) http://yourname.blogspot.com

Your blog will appear. Then look at the TOP RIGHT corner of your blog.


1. Sign In using your ID and password.
2. Then click on CUSTOMIZE - found beside Sign Out. (See diagram below)


3. Then click on ADD A PAGE ELEMENT. Another pop-up window will appear. If pop-up can't appear....then you need to press CTRL + clicking ADD A PAGE ELEMENT.


4. Find AdSense then click ADD TO BLOG.


5. Then (1) choose the FORMAT (I suggest 120X600 Vertical Banner). Then (2) choose the color so that it blends with your template. See the result instantly below. If you are happy then go down below and click SAVE CHANGES.


6. You will be back to the window ADD A PAGE ELEMENT. Here you can click and drag down to fill any location you want. Then SAVE it (Button at top right)


Note: The ADD A PAGE ELEMENT is an easy tools to add anything you want at any location. I have only shown you how to add AdSense here. Go and experiment with it and you will be surprised of your blog!!

Let me know if I have left anything out. Comment below this page. Thank you.

Enjoy AdSensing!
Forest Ang


How To Monetize Your Blog

Wait. Before you start, here are some questions.

Have you started your blog?
How many articles have you written?

If you have a blog now and have written about 10 articles, then it is time to apply for Google AdSense.

So what is Google AdSense?
Google AdSense belongs to Google. Google solidates advertisements from advertisers. We subsribe to the service and add the advertisement in our website. When visitors of our blog click on the advertisements, we will be paid for the clicks. You don't have to pay any dime to have Google AdSense - it's all FREE! Cheque will be sent to you after you have accumulated more than US$100.

If you are ready, click on the square banner(EARN MONEY BY SHOWING RELEVANT ADS WITH GOOGLE ADSENSE) below on the right of this page which will lead you to Google AdSense's application form. Remember it's FREE!

You need to register with your name (cheque will be sent to this name), address, your sign in ID, password, your website (ie your blog), etc. Just follow the instructions to register. Then wait.

Google AdSense will inspect your blog(or website) to confirm with their program policies. If your blog does not adhere to the policies then your website will be rejected. It is important that you are ready before you apply.

For bloggers, there are less restrictions as compare to business websites.
One important point to consider before applying - Lots of contents!

You will notice that I had Google Adsense in this blog although I had only 1 article in this blog. Actually I am already a member and I can use them on all my websites.

Don't worry, if you are rejected the first time, you can continue to apply after you have adhered to their policies. And yes, there are still other advertisers beside Google AdSense. But I love Google!

And remember - don't click on your own advertisements found in your blog, this is violation of the Program Policies.

To your success
Forest Ang

Tuesday, March 20, 2007

How To Start A Blog

What is a blog?

Blogging = online diary. You can write about anything you want - your school, your boss, your headmaster, your students, politics, hobbies and even your private love affair.

But first why do you want to blog?

1. To distribute information.
2. To discharge your energy.
3. To fulfill your passion to write.
4. To keep a diary about your thoughts.
5. To make passive earning.

Whatever your motives, I am going to teach you how to do it in simple and easy to understand guide. Yes, you can start a blog and publish it in 5 minutes.

There are 3 popular platforms to start a blog. You can choose any platform below and it is FREE!


We will start with Blogger.com because it is easy as 1-2-3 and its by Google!


How to create a blog in 3 easy steps:


1. Create your account. Login http://www.blogger.com/ Click NEW BLOGGER.


2. Name your blog. http ://<your name here>. blogspot.com (Note: No spacing allow)


3. Choose a template. Just pilih saja the color of your choice. Don't worry you can change the template later.


That's it - you are ready to write.

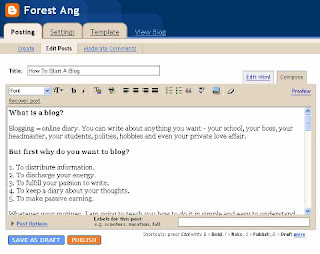
After writing and adding pictures (if any) you can click PUBLISH. Wahlah!!!!! Your blog is FINISHED.

You should continue to add as many articles to your blog before you apply for Adsense - to earn. I will write about How to Add Adsense's code in my next instalment.